
You never really hear about plastisol transfers until you get deeper into the wild world of garment decoration.
Maybe you’ve been heat pressing for some time and found out about plastisol transfers?
Read more: 5 Top reasons to get into heat pressing
Or perhaps you’re a novice screen printer looking to add to your services?
Whichever the case, if you’ve got questions about plastisol transfer, we’ve got the answers.
Today, we’ll start from the top and dive into the little known, but amazing world of plastisol transfers!
The birth of cool
Developed in the late 1950s, plastisol ink began to take over water-based inks because it provided clearer graphic details and more vibrant, opaque prints especially on darker garments.
Read more: Water-based or Plastisol? 7 Tips to Find Your Ideal Ink Type
But there was more.
Since plastisol ink didn’t dry up to ultimately clog the screen printing mesh like water-based did, this enabled printers to achieve higher efficiency in a mass-production setting.
Suddenly the newer, thicker, plastic-ky ink became a household name.
Throughout the 60s, during the industrial and commercial boom, screen printing with plastisol ink took off.
And by the 70s, as heat transfer applications were already popular within the home appliance and consumer electronics segment, printers started to screen print company logos on a special transfer paper that could be applied onto garments using heat.
Thus, birthing the plastisol transfer revolution.
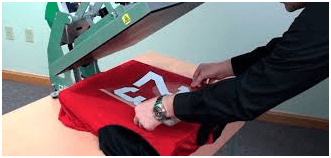
How do you apply plastisol transfers?
-
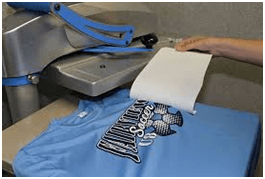
Source: impressionsmagazine.com
Before we get into the application of things, let’s break down the components of a plastisol transfer.
As an oil-based type ink, plastisol consists of two things:
- A plasticizer – a thick liquid that’s added to a synthetic resin to promote flexibility and lessen brittleness, and
- PVC resin – white powder that is usually utilized to produce a thermoplastic.
And using the same traditional screen printing process, printers use plastisol ink to print on a specialized heat transfer paper.
Read more: 6 Heat Transfer Paper Types & How To Find The Best One
After the final color is laid down, an adhesive powder is sprinkled on the wet ink.
This powder helps the ink stick to the garment when it’s time for heat pressing.
Once this is done, the ink is then gelled – not cured, using a heating element e.g. heat press. The term “gel-ing” simply means turning wet ink into a dry and stable state so it won’t come off if you rub or smudge it by accident.
Once gelled, plastisol transfers should be sealed and stored in a climate controlled environment, like an office. Avoid basements, garages, crawl spaces and sheds as these areas can get too hot, too cold, too humid and too dry.
When it’s time, use a heat press to print it on a garment like you would any regular heat transfer paper.
If stored correctly, plastisol transfers could last for many, many years.
So if you own a heat press machine and are looking to get produce high quality prints, definitely take a look at plastisol transfers.
Read more: 35 Profitable Items You Can Make with a Heat Press
It’s the middle ground between regular inkjet-based transfer papers and traditional screen printing.
Not only do you get a more vibrant and opaque image with plastisol inks, but the durability and washability are far more superior.
But how does it stack up to traditional screen printing?
Plastisol Transfers vs. Screen Printing
After surviving centuries, screen printing has grown to be the grandaddy of garment decoration, making plastisol transfers its great grandkids.
But in all its glory, screen printing isn’t without faults.
Let’s see the difference in durability, affordability and cost-effectiveness of the two methods.
Durability
After speaking to a handful of screen printers, the consensus is that screen printing is in fact more durable compared to plastisol transfers. But not by much.
Because both are essentially the same method of laying down ink of which is absorbed by the garment, the retention of ink vibrancy and overall durability is more or less the same.
But because plastisol transfers come with a shelf life, its ‘effectiveness’ will deteriorate over time if it’s kept in storage for a long time, making its print less durable and more susceptible to fading and cracking.
So if you’re moving towards transfers, make sure you store them well and use them before its expiration to maintain quality.
Affordability and Cost Effectiveness
If you own a heat press and print small batches of 5-10 t-shirts at a time, plastisol transfers could be more affordable than taking the screen printing route.
Custom made plastisol transfers are usually sold in “gang” sheets – multiple designs screen printed on (typically) an A3-sized transfer sheet – which effectively brings down the price per design.
Plus, if the designs contain similar colors, most printers won’t even charge additional setup fees, making plastisol transfers a very attractive option.
Read more: How to Skyrocket Your Profits with Gang Sheets
Having said that, the costs of using plastisol transfers in bulk will rise exponentially.
So if you’re printing above 10 pieces, screen printing is a more cost-effective option.
Let’s recap.
Plastisol Transfer Pros
- Possible to “gang” multiple images on a single sheet of transfer bringing down overall costs
- very affordable for small batches of printing
- achieve screen printing quality without the messy screen printing clean-up
- plenty of ready-made designs from printers
Plastisol Transfer Cons
- Uses plastisol ink which is non-biodegradable and harmful to the environment.
- Not the best option for bulk printing (anything above 10 prints)
- Proper storage is required to maintain quality of transfers
Screen Printing Cons
- Slower turnaround time due to its overall process
- expensive setup fees especially for low runs
Screen Printing Pros
- Perfect for bulk orders
- produces vibrant images that will last a long time
- able to achieve a wider range of complex effects
- able to switch to water-based inks which are better for the environment
- flexible in printing on more surface types including wood, metal and plastic
If you are already a screen printer with an entire setup, getting into plastisol transfers will require minimal cost and really, a no-brainer.
Aside from having to purchase transfer papers, you’ll need a heat press machine if you want to sell finish products.
Read more: 5 Multi-function Heat Presses That Won’t Break the Bank
Otherwise, selling custom made plastisol transfers could be very lucrative as well.
How to Make Your Own Custom Plastisol Transfers
If you’re already screen printing t-shirts and need an additional source of revenue, plastisol transfers can be a great compliment to your business.
On top of of having to purchase plastisol inks you’ll need some transfer paper – here are some types of plastisol heat transfer papers:
- Hot or Warm Peel transfers – designed to have a very soft hand and are very opaque. They are designed not to split but rather to release the entire ink film when peeled warm or hot. The fact that the hot peel transfers will release most of the ink film greatly increases the opacity.
- Cold Peel transfers – This transfer paper needs to be peeled when the T-shirt, as well as paper, have cooled down. A cold peel heat transfer will deposit all of the ink onto the printed garment. These kinds of heat transfers have great opacity and can also be used for foil transfers as well.
In addition to that, you’l need some transfer adhesion powder. Mix this material into your ink so it’ll stick to the garment when you transfer the image using a heat press machine.
Let’s get down to the steps.
Step 1: Setting up for printing
I’m going to assume you already know the basics of screen printing, so instead of using a regular t-shirt, replace it with either a hot or cold peel heat transfer paper.
Read more: Complete Guide to Hot, Warm and Cold Peel Heat Transfer Paper
The biggest difference when it comes to printing plastisol transfers is the way you would set up and burn your stencils.
Since we’re essentially printing on a piece of paper, the image has to be in the reverse. Only then will it show up correctly on the shirt once it is reversed again during the heat pressing process.
Once your frames are done, you’ll need to set the usual off-contact – approximately a quarter in height – before printing. Also check to make sure the transfer paper is aligned with your screens.
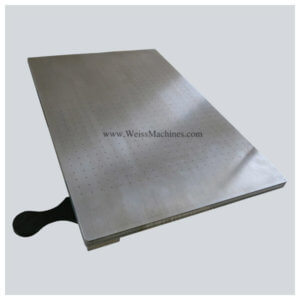
I like to use some tack spray to hold the paper in place.
This isn’t ideal since tack spray leaves a sticky residue, so if you’re planning to offer custom plastisol transfers, consider getting a vacuum pallet (below) that is essential for holding down the transfers with suction while screen printing.
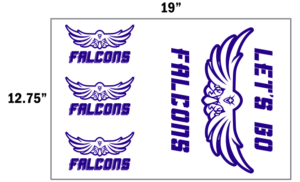
Step 2: Printing Hierarchy
If you’re printing multiple colors, you will need to print each layer in reverse.
Consider the alphabets below as an example.
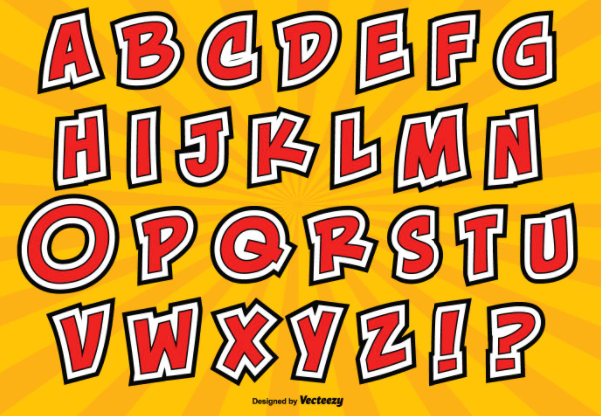
To prepare this for print, we’d need to separate the colors red, white and black (ignore the background)
And assuming we are creating a plastisol transfer that will be pressed onto a dark garment, you would need to lay down the red layer first, followed by black and the white goes on last (treating it as the under-base).
Many suggest using a 70 degree durometer squeegee because printing on paper and printing on garment will require different levels of hardness. I wouldn’t be as strict, but I do notice a sharper squeegee works better for me.
Nevertheless, try using opaque and thicker inks like Union Ink’s Ultra-Soft Plus Inks because they hold up better in the transfer process compared to regular plastisol inks.
Step 3: Apply Adhesion Powder
Some printers suggest adding this powder adhesive to the plastisol ink prior to printing (at a quantity of 5% of ink to be used).
I usually sprinkle or dip the wet transfer print into a bin of powder because it’s more convenient. I say try both and see which one fits your style.
If you’re doing the dipping method, just fill up a bin or pan with adhesion powder and pull the printed transfer through. Shake or dust off the unprinted areas with a soft brush.
Take note, try not to breath in the powder or put on a mask.
I find applying adhesion powder also makes a huge difference in longevity and preventing fading after washes.
Step 4: Gel the Ink
Depending on the type, plastisol inks typically begin to gel at around 175 to 250 degrees (Fahrenheit) and cure above 320 degrees.
For this final step, we will gel, not cure the plastisol transfer for storage.
I recommend using a multipurpose heat source like a heat press to start the gelling process.
Always check with a temperature gun to make sure it’s not to exceed the recommended temperature as this will cause bonding issues later on.
Also keep in mind that the time it takes for the ink to gel depends on the image type as well. The larger the print area, the more time it takes.
Also be cautious not to under-gel. I’ve personally never had this happen but most people say that you’ll start to see cracks in the ink if that happens. Let me know if the comments if this is something you’ve experienced.
Once gelling is done I suggest storing it in a sealed bag in dry area. And that’s it!
If you’re screen printing custom plastisol transfers to be stored, your journey ends here.
If your hustle is to continue pressing them onto garments, then move on to the final step.
Heat press and curing
If you ask me, this is by far the most satisfying part of the entire process – to see your work successfully pressed on a piece of garment!
Read more: Should you buy a new or used heat press machine?
If you’re fulfilling orders, always make sure you’re setting the heat press temperature according to the type of transfer paper – hot or cold peel – to avoid mistakes down the line like color fading and cracking.
So I hope this article has answered some questions you had about plastisol transfers.
If you’re looking for quality transfers that’s a step above regular inkjet and laser transfers, you won’t go wrong with plastisol transfers. It might costs a bit extra but in the long run it’s well worth the money.
And if you’re a screen printer looking to add another revenue stream, getting into plastisol transfers will definitely open doors to greater things.
Thanks for reading guys, if you have any questions, feel free to leave them in the comments!
