T-shirt heat transfers is the easiest way to start customizing apparel and start something rewarding from home. Get some heat transfer papers, print your design using a home printer, and use a heat press to finish the job. In some cases, an iron will do the trick. Money right?
If you are reading this, chances are this scenario is far from reality. There are so many heat transfer paper mistakes that can set you back, and even discourage you completely from continuing the journey.
Today I’ve gathered the most common and easily fixable mistakes most, if not all, beginners face. Even if you’ve been doing this for a while, it can happen when working with a new brand of heat transfer paper, which is 90% of the case.
Since there are so many manufacturers both local and international, plus the abundance of factors that can impact the outcome, we won’t know what’s going wrong.
Let’s get down to it.
Heat transfer paper issues for cotton, poly, and polyblends
This article will help you if you are experiencing any of these four problems:
- the design is cracking, peeling off, or washing out
- design is not transferring to the garment after a press
- heat transfer paper is not peeling off easily after a press
- design has noticeable bubbles, specks, or spots
Before we go any further, I’m going to cover some (really) basic stuff. Most of you know this already, so consider it a reminder. There are so many things to track and we often take these little things for granted.
For newcomers, the next paragraph will equip you for a better experience.
The details are in the paper and heat press setting
Needless to say, not all heat transfer papers are created from the same factory. So the first thing you’ll need to do is identify where your papers are from. I would skip buying from big chain stores like Walmart or Office Depot.
They aren’t made to produce quality prints and you’re better off with reputable brands like Avery, Stahls, F&M, Chemica, etcetera. These companies do their research and tests to give you the best heat transfer papers that produce bright and vibrant prints that won’t fade after one wash.
Next up, inkjet or laser? Printer and ink type matter and if you’re wondering whether one is better than the other – stop wondering. The debate is ongoing so my suggestion is to make sure whichever printer and ink combo you’re using is suitable for the material you’re printing on e.g. cotton, polyester, or poly-blend.
Once that’s OK, check to see if the heat transfer papers are for light or dark garments. Printing on light is a lot easier to manage when you’re a beginner as darks will require an extra step.
And finally to the heat press. This really should be the first thing to point out because at the end of the day, it all comes down to pressure, time, and temperature settings.
Also, I can’t stress this enough, get yourself a heat press machine. A home iron will not give you great results because you’ll need consistent pressure and temperature for the designs to weave into the fabric completely. It can be challenging with a hand iron.
In case you are considering buying a heat press, read this first before making a decision.
I’ll go over a few more ‘good-to-knows’ and best practices for beginners later in the article, but for now, let’s dive into the problems at hand.
[Solved] 4 Common heat transfer paper mistakes
Heat Transfer Paper Mistake #1: the design is cracking, peeling off, or washing out

Solutions to consider:
The type of ink you’re using is important. If you’re experiencing any of this, chances are you’re printing with dye-based inks. Dye inks are water-soluble as compared to pigment-based inks as they will not bleed or fade and is recommended.
If you need to use dye-based inks, that’s fine too. Just make sure it matches the heat transfer paper. Some papers like the Jet Pro Soft Stretch works well with dye-based inks.
Next is to check the temperature and pressure setup. Certain temperatures are required for the ink from the transfer paper to bond with the fabric, if you miss the mark you’ll get cracks, peeling, and washing out. The same goes for pressure. Look at the manufacturer’s instructions. Not knowing is a guessing game that is just begging for disaster.
Another common mistake is washing the garment too soon after printing. As a general guideline, allow 24 hours for the print to set in before you put it through a wash test.
When you do wash it, turn the garment inside out as this prevents friction directly to the transfer.
Heat Transfer Paper Mistake #2: design is not transferring to the garment after a press
Solutions to consider:
In my experience, raising the temperature a little helps activate the bonding agents. Keep in mind that when you do this, make sure it doesn’t get too hot especially if you’re printing on polyester, acrylic, or nylon-based garments. You do not want a scorched t-shirt.
If you’ve ruled out the temperature setting, then the next thing to check is the pressure.
You should have full pressure (not to be confused with firm or heavy settings). When the heat press is closed, try to pull the t-shirt or paper out. If you can, then it’s not considered full pressure. Constant full pressure is what you need to transfer a design to your garment.
Another thing you can do is try a second press with a silicone or teflon sheet afterward. After the initial press, cover the image and press it for an additional 5 seconds. This could help set the ink in place.
Heat Transfer Paper Mistake #3: heat transfer paper is not peeling off easily after a press
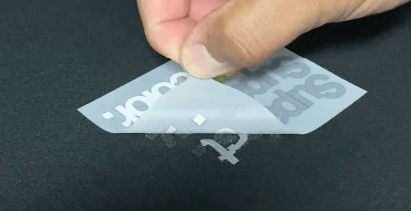
Solutions to consider:
If you’re experiencing this, it means the transfer process was not completed. Start by making sure the pressure is set up right. Too much pressure may have caused the stickiness between the transfer and the garment.
If the pressure is OK, try increasing either the temperature or the time duration. Sometimes the ink needs more heat or time to melt and weave into the fabric so it can be released. Once again, make sure to stay within the heat limit of the garment you’re printing on.
Lastly, if it calls for a cold peel and it doesn’t work, try peeling it warm. There definitely is a subjective element to what is cold, warm, and hot.
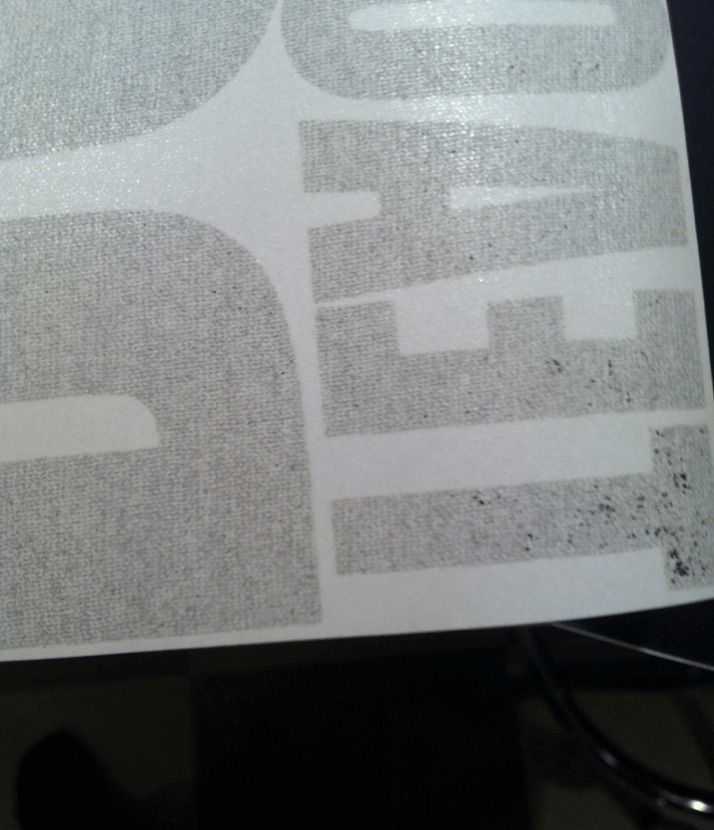
Heat Transfer Paper Mistake #4: design has noticeable bubbles, specks, or spots
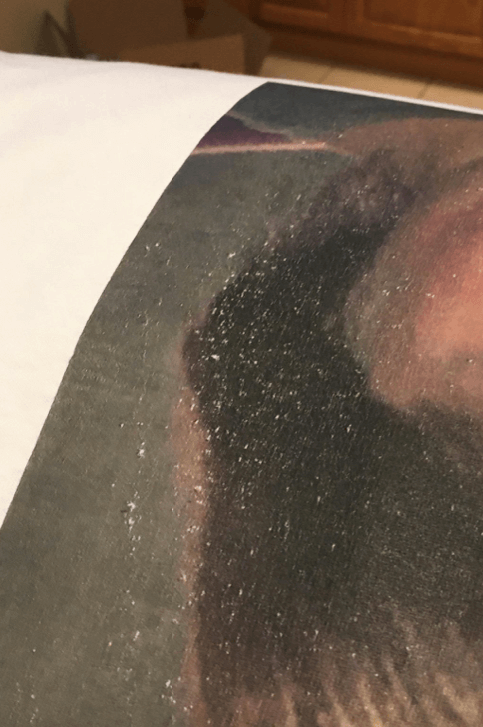
Solutions to consider:
If you’re getting this blotchy mess then it could be a sign that not all of the ink melted into the fabric. Experiment by increasing the heat temperature or pressing time.
Another option is to give it a second press. How long depends on the severity of the spots. Start with 3 seconds and go up from there (within the limit), hopefully, it will force all the ink to cure under the second round.
If the issue persists, you may need to double-check your heat press. It’s common for the heating element to have ‘cold spots’ producing uneven pressure and inconsistent heat and temperature across the surface of the press.
Lastly, try using a new sheet of teflon or a different heat-resistant paper to lay over the transfer before the press. These sheets come with a smooth finish and it could help remove the issue.
More tips to avoid beginner mistakes
We all want to offer quality to our customers and that means taking the necessary steps to avoid the tiniest of errors.
Here’s a list of best practices for beginners to avoid heat transfer paper mistakes at home.
- Always pre-press the shirt, but do not heat the shirt too much. Press it enough (3 seconds) to make it flat and remove the moisture.
- Temperature settings are often built into the heat press, but what about the temperature of the garment? A simple cooking temp gun will come in handy when it’s time for some troubleshooting.
- Some t-shirt manufacturers (Gildan) are known to have lint on their tees that can mess up a good print. Use a lint remover.
READ: 5 Important Things to Know Before Contacting Wholesale Blank Suppliers
- Heat transfer papers have an expiration date. If it’s stored for too long there’s a chance it won’t give you the results you want. Always store them according to the manufacturer’s label.
- Skip using iron-on heat transfer papers if you ever want professional results. Go with a professional heat press, these are all going for under $150!
One last thing before I leave you. As you start your adventure, I suggest ordering samples from different companies and trying them out. This will not only give you peace of mind but will save you time and money down the road.
If and when you encounter a problem, there are many variables to eliminate but the will to troubleshoot via trial and error is the best attitude to have to find a solution.
