Getting the perfect ‘burn’ or exposure on a screen sits quite high on my happy list.
The feeling of satisfaction and elation I felt the first time I washed out a perfectly exposed stencil is what I want you to feel, too.
And since 10/10 newbie screen printers will no doubt come face to face with screen printing exposure problems during their journey, I thought it would be a good idea to illustrate some scenarios.
3 common screen printing exposure problems
Screen exposure problem 1
The image appears or you can see the ghostly image, but it takes forever (more than 5 minutes) to wash out the unexposed area of emulsion.
What does this mean?
The screen is now OVEREXPOSED to the emulsion. Yep, UV light has caused the emulsion to harden/thickened up.
Make sure you are using a good exposure system.
Make sure you’re in a dark room, free from any UV leakage.
Make sure you aren’t using the Sun (you can, but you’ll start tearing out your hair)
Solution: Experiment with cutting down on exposure time and cutting back on emulsion coats.
If you’ve done 2 coats front and back (2×2), try using only 1 coat on each side (1×1) or coating 1 coat on one side and 2 coats on another (1×2). The typical way to coat 1×2 is to have 2 coats on the print side (side which touches the garment/substrate).
Another probable cause could be that the image print (stencil) isn’t opaque/dark enough. This allowed UV rays to leak onto the emulsion.
What to do here? Multiply with another print copy or take a Sharpie and darken the entire image. I personally use a stencil that has been cut out using my vinyl cutter.
Screen exposure problem 2
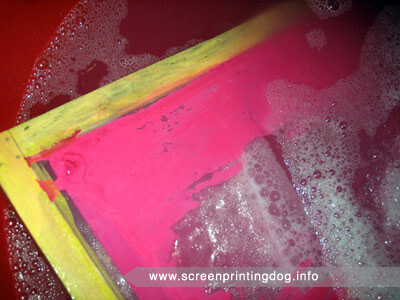
The image appears to look great at first, but peels off while you’re spraying it down. What happened?
You have UNDEREXPOSED the stencil and it’s all being washed away 🙁
Solution: Increase exposure time. Or keep the current exposure time and lay on another coat of emulsion on either the print side or squeegee side.
Experiment with both sides going up to 2 sides each (it’s rare that you need to coat it beyond that)
Screen exposure problem 3
The image appears to look great, but the fine lines along the image peels away.
What does this mean?
There are a few common problems to this, let’s check them all.
- the opacity of the image/stencil isn’t dark enough. Solution: Do as you would if you’ve underexposed the screen.
- the mesh you are using isn’t suited for fine lines. Solution: Change your screen mesh. You can identify the type of mesh that suits your graphics.
- image has too many fine lines. Solution: If you’re using Adobe Photoshop or Illustrator, make sure your lines are never below 1px. I’ve done 0.5px but that’s after years of testing.
Take-away and FREE fix
The key take-away of this article is to keep on testing.
Screen exposure is one of (if not the) trickiest part of screen printing, but once you get all the variables of exposure time, opacity, and emulsion coat down you’ll notice how easy it is to get into the flow of things.
To help you correctly expose your next screen, head over to my foolproof (and free!) exposure calculator that will help you achieve burn perfection.
Read more: 15 Screen Printing Mistakes to Avoid to Stay Motivated
How to make sure your next screen is exposed correctly
Even before you start exposing your screens, it’s important to go through the right preparations.
Let’s start with your screens.
Make sure that you have a clean mesh – this means it’s free from dust, dirt, sand even strands of fibre like hair and cotton threads. I’ve ruined many screens with this simple oversight.
Again, like I mentioned above, make sure the stencil you have completely blocks out light.
Now it’s time to expose it.
Although uncommon, the light source you’re using to expose the screen might be the problem. As you already know, any UV light will expose a screen (even the Sun), but you want consistency.
So you’ll need an exposure unit. You can buy one, or do what I did and build one for yourself.
Keep in mind that there’s a few things to think about like distance, exposure time, emulsion type, etc that I won’t get into here.
If you want a full breakdown and explanation, check out my full screen printing tutorial designed for new printers like yourself.
